Python 가이드
Python SDK를 사용하여 Python 프로젝트에 햅틱을 구현할 수 있습니다.
- 패키지 설치
- 햅틱 환경 설정
요구 사항
- OS: Windows 10/11 (x64), macOS (Apple Silicon)
- Python 3.8 - 3.12
- bHaptics Player 설치 및 실행
- 프로젝트에 해당하는 배포된 햅틱 애플리케이션
- 햅틱 앱의 앱 ID와 API 키
About haptic application
You can create and manage haptic apps in Developer Portal, a web-based tool.
If you're unfamiliar with haptic apps or haven't created one yet, please follow the Portal guide before proceeding.
Before linking a haptic app to your game project, make sure the haptic app meets the following requirements:
- At least one haptic event must be created.
- API Key must be generated.
- There is no API Key by default. To generate one, go to the "API Key" tab and click "New" button.
- Haptic app must be deployed
- If you see "Deploy Now" button in the upper right corner, click it to deploy your haptic app. Otherwise, if you can see "Up to date", it means that the latest haptic app has already been deployed.
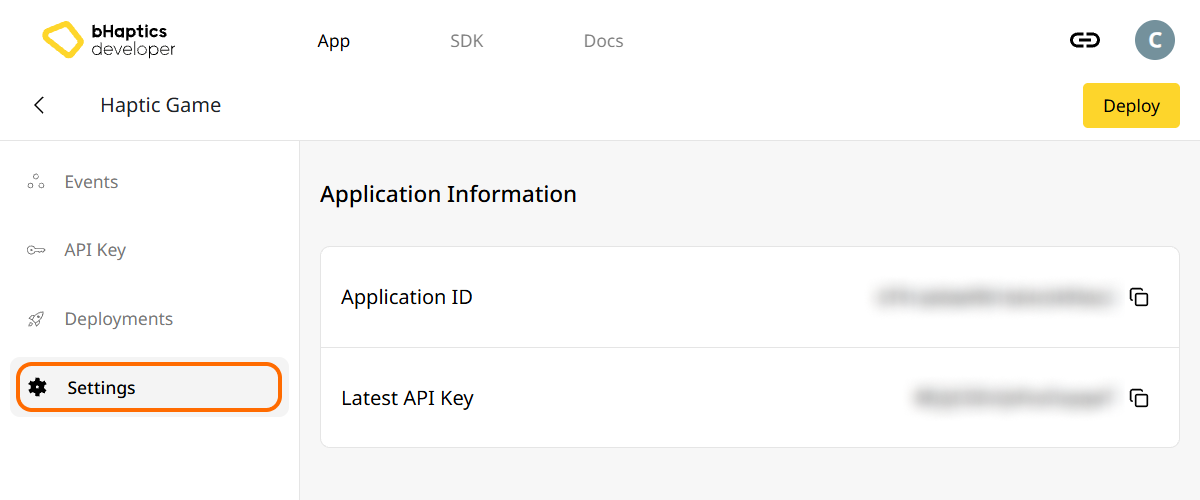
Also, link process requires App ID and API Key. Go to the "Settings" tab, and check the App ID and API Key.
설치
PyPI에서 pip를 통해 bHaptics Python SDK를 설치합니다:
pip install bhaptics-python
패키지 가져오기
# bHaptics SDK
import bhaptics_python

# Coroutine
import asyncio
대부분의 함수가 코루틴이므로 asyncio 패키지도 가져와야 합니다.
햅틱 환경 설정
햅틱 관련 함수를 사용하기 전에 햅틱 앱을 프로젝트에 연결하고 햅틱 환경을 초기화해야 합니다.
이를 위해서는 햅틱 앱의 앱 ID와 API 키가 필요합니다. bHaptics Developer Portal에서 확인할 수 있습니다.
초기화
"your_app_id"와"your_api_key"를 본인의 앱 ID와 API 키로 교체하세요.- Python 스크립트를 실행하기 전에 bHaptics Player 애플리케이션이 컴퓨터에서 실행 중인지 확인하세요.
import bhaptics_python
import asyncio

async def main():
    app_id = "your_app_id"        # Replace with your App ID
    api_key = "your_api_key"      # Replace with your API key

    # Initialize SDK
    result = await bhaptics_python.registry_and_initialize(app_id, api_key, "")
    print(f"Initialization result: {result}")

    # Example: Play a haptic event
    event_name = "your_event_name"
    request_id = await bhaptics_python.play_event(event_name)
    print(f"Playing event: {event_name}, Request ID: {request_id}")

asyncio.run(main())
디바이스 인덱스에 대하여
bHaptics SDK는 여러 디바이스를 동시에 제어할 수 있습니다. 디바이스 인덱스 시스템을 사용하여 모든 디바이스 또는 특정 디바이스를 대상으로 지정할 수 있습니다.
모든 햅틱 디바이스는 고유한 디바이스 인덱스를 가집니다. 기본적으로 디바이스 인덱스는 -1로 설정됩니다. 디바이스 인덱스는 bHaptics Player를 통해 변경할 수 있습니다.
- 모든 디바이스:
device_index매개변수가 없는 함수는 변경되지 않은 모든 디바이스(디바이스 인덱스가-1)에 적용됩니다. - 특정 디바이스:
device_index매개변수가 있는 함수는 특정 디바이스를 대상으로 합니다.
# Affect all unmodified devices.
await bhaptics_python.play_event(event_name)

# Affect only devices that device index is 0.
await bhaptics_python.play_event(event_name, 0)
디바이스 인덱스는 bHaptics Player에서 확인하거나 설정할 수 있습니다.
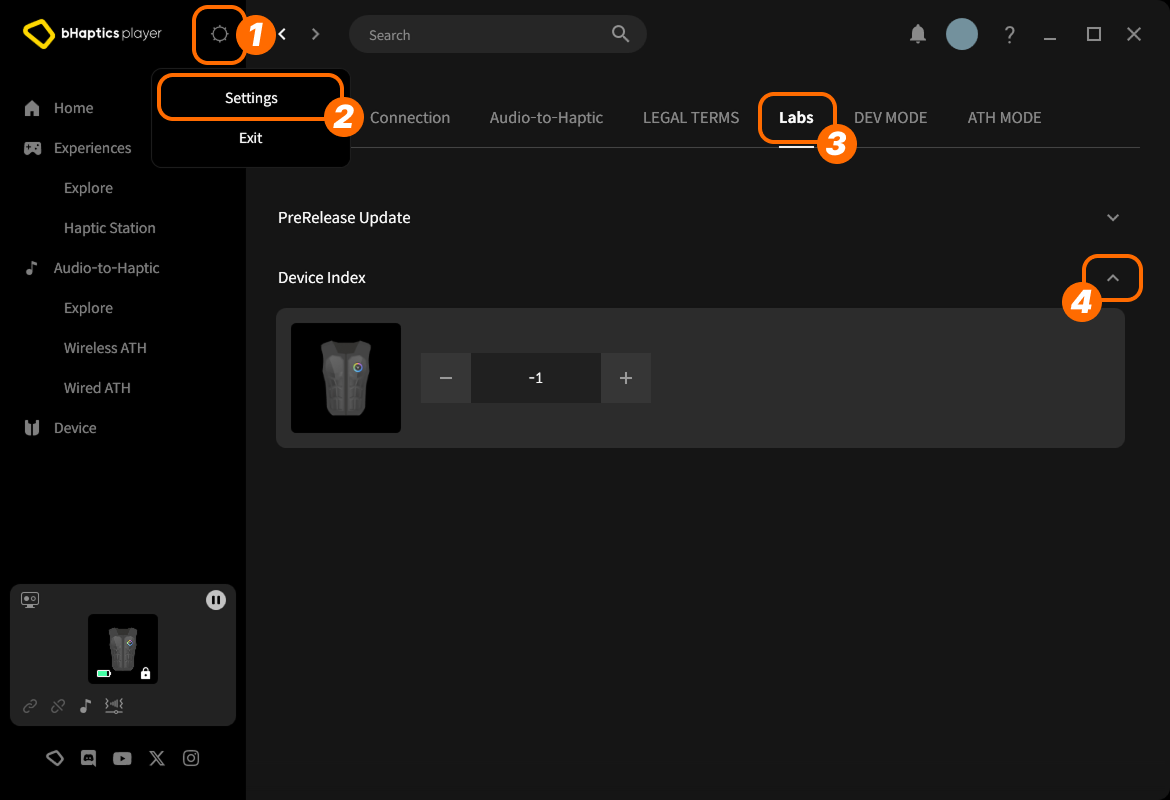
- 오른쪽 위에서 setting icon(설정 아이콘)을 클릭합니다.
- "Settings"를 클릭합니다.
- "Labs" 탭으로 이동합니다.
- "Device Index"를 펼칩니다.
그런 다음 목록에서 디바이스를 찾아 "+" 또는 "-"를 클릭하여 인덱스를 조정합니다.
디바이스 타입에 대하여
디바이스 타입마다 범위가 다릅니다. 특정 신체 부위에 햅틱이 필요할 때 사용합니다.
| 값 | 디바이스 | 착용 위치 | 모터 수 |
|---|---|---|---|
0 | TactSuit Pro | 상체 | 32 |
1 | TactSleeve(Left) | 왼쪽 손목 | 3 |
2 | TactSleeve(Right) | 오른쪽 손목 | 3 |
3 | TactVisor | 머리 | 4 |
4 | Tactosy for Hands(Left) | 왼손 | 3 |
5 | Tactosy for Hands(Right) | 오른손 | 3 |
6 | Tactosy for Feet(Left) | 왼발 | 3 |
7 | Tactosy for Feet(Right) | 오른발 | 3 |
8 | TactGlove(Left) | 왼손 | 8 |
9 | TactGlove(Right) | 오른손 | 8 |
디바이스 타입 값은 이벤트를 사용하지 않고 모터의 진동 강도를 직접 지정하는 햅틱 함수에서 사용됩니다.
device_type = 0    # TactSuit Pro
motors_count = 32  # TactSuit Pro has 32 motors

strength = 50      # 50% strength
duration = 400     # 400 milliseconds

await bhaptics_python.play_dot(device_type, duration, [strength] * motors_count)
더 읽어보기
이제 bHaptics 햅틱 기능을 사용할 준비가 되었습니다! 프로젝트에서 햅틱을 재생하려면 Python 레퍼런스를 방문하거나, 아래의 전체 예제 코드를 참고하세요.
이 라이브러리를 사용하는 데 문제가 있다면 문제 해결을 확인하세요.
전체 예제 코드
import bhaptics_python
import asyncio
import time

async def haptic_demo():
    # 1. Initialization
    app_id = "your_app_id"
    api_key = "your_api_key"

    print("🔧 Initializing bHaptics SDK...")
    result = await bhaptics_python.registry_and_initialize(app_id, api_key, "")
    print(f"Initialization result: {result}")

    print("✅ Connected to bHaptics Player.")

    # 2. Check device information
    device_info = await bhaptics_python.get_device_info_json()
    print(f"📱 Connected device info: {device_info}")

    # 3. Test haptic effects
    print("\n🎮 Starting haptic effect tests...")

    # Play dot pattern
    print("• Playing dot pattern")
    values = [50] * 16 + [0] * 16  # Activate first 16 of 32 motors
    await bhaptics_python.play_dot(0, 2000, values)
    await asyncio.sleep(2.5)

    # Play path pattern
    print("• Playing path pattern")
    x = [0.2, 0.4, 0.6, 0.8]
    y = [0.2, 0.8, 0.2, 0.8]
    intensity = [80, 60, 80, 60]
    await bhaptics_python.play_path(0, 3000, x, y, intensity)
    await asyncio.sleep(3.5)

    # Test glove haptics (if available)
    print("• Testing glove haptics")
    glove_motors = [100] * 8
    glove_playtimes = [500] * 8
    glove_shapes = [2] * 8

    # Left hand
    await bhaptics_python.play_glove(8, glove_motors, glove_playtimes, glove_shapes, 0)
    await asyncio.sleep(1)

    # Right hand
    await bhaptics_python.play_glove(9, glove_motors, glove_playtimes, glove_shapes, 0)
    await asyncio.sleep(1)

    # 4. Cleanup
    await bhaptics_python.stop_all()
    await bhaptics_python.close()
    print("🔚 Demo completed")

# Run the demo
if __name__ == "__main__":
    asyncio.run(haptic_demo())
더 많은 예제를 살펴보고 싶다면 공식 GitHub 저장소의 README를 확인하세요.
에러 처리
프로덕션 애플리케이션에서는 항상 SDK 호출을 try-catch 블록으로 감싸세요:
try:
    result = await bhaptics_python.registry_and_initialize(app_id, api_key, "")
    if not result:
        print("Failed to initialize bHaptics SDK")
except Exception as e:
    print(f"Error initializing SDK: {e}")