Swift 가이드
Swift SDK를 사용하여 iOS, visionOS, macOS 앱에 햅틱을 구현할 수 있습니다.
- 패키지 설치
- 햅틱 환경 설정
- 디바이스 연결
요구 사항
- Xcode 16 이상
- OS: iOS 13.0+, visionOS 2.0+, macOS 10.15+
- 초기화 시 햅틱 이벤트를 다운로드하기 위한 인터넷 연결
- macOS 전용: bHaptics Player 설치 및 실행
- 프로젝트에 해당하는 배포된 햅틱 애플리케이션
- 햅틱 앱의 앱 ID와 API 키
- iOS / visionOS: SDK가 Bluetooth LE를 통해 햅틱 디바이스에 직접 연결합니다. 별도의 컴패니언 앱이 필요하지 않습니다.
- macOS: SDK가 bHaptics Player에 연결하고, bHaptics Player가 햅틱 디바이스를 관리합니다. 디바이스는 bHaptics Player에서 페어링하세요.
모든 플랫폼에서 동일한 API를 사용합니다.
About haptic application
You can create and manage haptic apps in Developer Portal, a web-based tool.
If you're unfamiliar with haptic apps or haven't created one yet, please follow the Portal guide before proceeding.
Before linking a haptic app to your game project, make sure the haptic app meets the following requirements:
- At least one haptic event must be created.
- API Key must be generated.
- There is no API Key by default. To generate one, go to the "API Key" tab and click "New" button.
- Haptic app must be deployed
- If you see "Deploy Now" button in the upper right corner, click it to deploy your haptic app. Otherwise, if you can see "Up to date", it means that the latest haptic app has already been deployed.
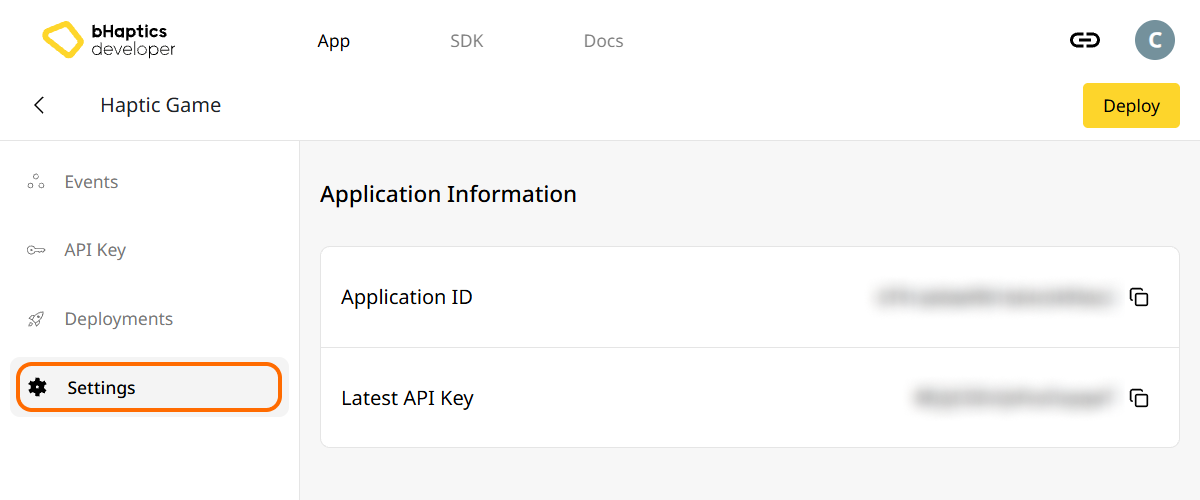
Also, link process requires App ID and API Key. Go to the "Settings" tab, and check the App ID and API Key.
설치
Swift Package Manager로 bHaptics Swift SDK를 설치합니다.
- Xcode에서 File > **Add Package Dependencies...**를 선택합니다.
- 패키지 URL을 입력합니다:
https://github.com/bhaptics/bhaptics-ios - Dependency Rule을
1.0.1부터 Up to Next Major Version으로 설정합니다. Bhaptics라이브러리를 앱 타깃에 추가합니다.
Package.swift에서 의존성을 관리한다면 아래와 같이 패키지를 추가합니다:
dependencies: [
    .package(url: "https://github.com/bhaptics/bhaptics-ios", .upToNextMajor(from: "1.0.1"))
],
targets: [
    .target(
        name: "YourApp",
        dependencies: [.product(name: "Bhaptics", package: "bhaptics-ios")]
    )
]
패키지 가져오기
import BhapticsPlugin
Bluetooth 권한
iOS / visionOS: 앱 타깃의 Info 설정에 NSBluetoothAlwaysUsageDescription(Privacy - Bluetooth Always Usage Description)을 추가하고, 앱이 Bluetooth를 사용하는 이유를 설명하는 메시지를 입력합니다. 권한 요청 창은 BhapticsKit을 생성할 때 표시됩니다. 이 키가 없으면 SDK가 Bluetooth에 접근할 때 앱이 강제 종료됩니다.
macOS: App Sandbox가 활성화되어 있다면 Signing & Capabilities > App Sandbox에서 **Outgoing Connections (Client)**를 체크하여 SDK가 bHaptics Player에 연결할 수 있도록 합니다.
햅틱 환경 설정
햅틱 관련 함수를 사용하기 전에 햅틱 앱을 프로젝트에 연결하고 햅틱 환경을 초기화해야 합니다.
이를 위해서는 햅틱 앱의 앱 ID와 API 키가 필요합니다. bHaptics Developer Portal에서 확인할 수 있습니다.
초기화
"your_app_id"와"your_api_key"를 본인의 앱 ID와 API 키로 교체하세요.BhapticsKit인스턴스는 하나만 생성하고 앱이 실행되는 동안 유지하세요.
import BhapticsPlugin

let kit = BhapticsKit()

Task {
    let result = await kit.initialize(appId: "your_app_id", apiKey: "your_api_key", defaultSetting: "")
    print("Initialization result: \(result)")

    // Example: Play a haptic event
    let requestId = kit.play(eventId: "your_event_name")
    print("Request ID: \(requestId)")
}
iOS와 visionOS에서는 initialize가 서버에서 햅틱 앱의 햅틱 이벤트를 다운로드합니다. macOS에서는 bHaptics Player에 연결하므로, initialize를 호출하기 전에 bHaptics Player를 실행해 둡니다.
디바이스 연결
이 단계는 iOS와 visionOS 전용입니다. macOS에서는 bHaptics Player에서 디바이스를 페어링하세요.
SDK는 Bluetooth LE로 주변의 bHaptics 디바이스를 찾습니다. 디바이스를 한 번 페어링하면 SDK가 이를 기억하고, 이후 스캔에서 발견될 때 자동으로 다시 연결합니다.
- Bluetooth가 준비될 때까지 기다린 후
scan()을 호출합니다. - 찾은 디바이스를 사용자에게 보여주고, 사용자가 선택한 디바이스에 대해
pair(device:)를 호출합니다. - 완료되면
stopScan()을 호출합니다.
Bluetooth가 준비되거나 디바이스 목록이 변경될 때 알림을 받으려면 BhapticsKitDelegate를 구현합니다.
import BhapticsPlugin

final class HapticManager: BhapticsKitDelegate {
    private var kit: BhapticsKit!
    private(set) var devices: [BhapticsDevice] = []

    init() {
        kit = BhapticsKit(delegate: self)
    }

    func pair(_ device: BhapticsDevice) {
        kit.pair(device: device)
    }

    // Bluetooth is ready. Start scanning.
    func bHapticsKit(_ kit: BhapticsKit, bleStateChange state: Bool) {
        if state {
            kit.scan()
        }
    }

    // Found, paired, connected, or disconnected devices.
    func bHapticsKit(_ kit: BhapticsKit, deviceStateUpdated devices: [BhapticsDevice]) {
        self.devices = devices
    }

    func bHapticsKit(_ kit: BhapticsKit, didConnect device: BhapticsDevice) {
        print("Connected: \(device.name)")
    }

    func bHapticsKit(_ kit: BhapticsKit, didDisconnect device: BhapticsDevice) {
        print("Disconnected: \(device.name)")
    }
}
iOS Simulator와 visionOS Simulator에서는 Bluetooth가 동작하지 않습니다. 햅틱 디바이스를 테스트하려면 실제 디바이스를 사용하세요.
Position에 대하여
이벤트 없이 햅틱을 재생하는 함수는 position을 Int로 받습니다. 이 값은 다른 bHaptics SDK와 공통입니다. BhapticsPosition.index로 값을 얻을 수 있습니다.
BhapticsPosition | index | 디바이스 | 모터 수 |
|---|---|---|---|
.Vest | 0 | TactSuit Pro | 32 |
.ForearmL | 1 | TactSleeve(Left) | 3 |
.ForearmR | 2 | TactSleeve(Right) | 3 |
.Head | 3 | TactVisor | 4 |
.HandL | 4 | Tactosy for Hands(Left) | 3 |
.HandR | 5 | Tactosy for Hands(Right) | 3 |
.FootL | 6 | Tactosy for Feet(Left) | 3 |
.FootR | 7 | Tactosy for Feet(Right) | 3 |
.GloveL | 8 | TactGlove(Left) | 8 |
.GloveR | 9 | TactGlove(Right) | 8 |
let motorsCount = 32  // TactSuit Pro has 32 motors
let strength = 50     // 50% strength
let duration = 400    // 400 milliseconds

kit.playDot(position: BhapticsPosition.Vest.index, durationMillis: duration, arr: [Int](repeating: strength, count: motorsCount))
더 읽어보기
이제 bHaptics 햅틱 기능을 사용할 준비가 되었습니다! 프로젝트에서 햅틱을 재생하려면 Swift 레퍼런스를 방문하거나, 아래의 전체 예제 코드를 참고하세요.
이 라이브러리를 사용하는 데 문제가 있다면 문제 해결을 확인하세요.
전체 예제 코드
아래 예제는 SDK를 초기화하고, 페어링할 주변 디바이스를 나열하고, 햅틱을 재생하는 SwiftUI 앱입니다.
예제는 SwiftUI .task와 Section을 사용하므로 iOS 15 / macOS 12 이상이 필요합니다 (SDK 자체는 iOS 13 이상을 지원합니다).
import SwiftUI
import BhapticsPlugin

final class HapticViewModel: ObservableObject, BhapticsKitDelegate {
    // Replace with your App ID and API Key from the bHaptics Developer Portal.
    private let appId = "your_app_id"
    private let apiKey = "your_api_key"

    private var kit: BhapticsKit!

    @Published var status = "Not initialized"
    @Published var devices: [BhapticsDevice] = []
    @Published var events: [String] = []

    init() {
        kit = BhapticsKit(delegate: self)
        devices = kit.getDevices()
    }

    // 1. Initialize
    @MainActor
    func initialize() async {
        status = "Initializing..."
        let result = await kit.initialize(appId: appId, apiKey: apiKey, defaultSetting: "")
        status = result ? "Initialized" : "Initialization failed"
        events = kit.getEventList().sorted()
        devices = kit.getDevices()
    }

    // 2. Pair devices
    func togglePair(_ device: BhapticsDevice) {
        if device.paired {
            kit.unpair(device: device)
        } else {
            kit.pair(device: device)
        }
    }

    // 3. Play haptics
    func play(_ event: String) {
        _ = kit.play(eventId: event)
    }

    func playDot() {
        // First 16 of the TactSuit Pro's 32 motors.
        let motors = [Int](repeating: 50, count: 16) + [Int](repeating: 0, count: 16)
        kit.playDot(position: BhapticsPosition.Vest.index, durationMillis: 1000, arr: motors)
    }

    func stopAll() {
        kit.stopAll()
    }

    // BhapticsKitDelegate
    func bHapticsKit(_ kit: BhapticsKit, bleStateChange state: Bool) {
        if state { kit.scan() }
    }

    func bHapticsKit(_ kit: BhapticsKit, deviceStateUpdated devices: [BhapticsDevice]) {
        self.devices = devices
    }

    func bHapticsKit(_ kit: BhapticsKit, didConnect device: BhapticsDevice) {
        devices = kit.getDevices()
    }

    func bHapticsKit(_ kit: BhapticsKit, didDisconnect device: BhapticsDevice) {
        devices = kit.getDevices()
    }
}

struct ContentView: View {
    @StateObject private var viewModel = HapticViewModel()

    var body: some View {
        List {
            Section("Status") {
                Text(viewModel.status)
            }
            Section("Devices") {
                ForEach(viewModel.devices) { device in
                    Button {
                        viewModel.togglePair(device)
                    } label: {
                        HStack {
                            Text(device.name)
                            Spacer()
                            Text(device.connected ? "Connected" : device.paired ? "Paired" : "Tap to pair")
                        }
                    }
                }
            }
            Section("Events") {
                ForEach(viewModel.events, id: \.self) { event in
                    Button(event) { viewModel.play(event) }
                }
            }
            Section {
                Button("Play dot") { viewModel.playDot() }
                Button("Stop all") { viewModel.stopAll() }
            }
        }
        .task { await viewModel.initialize() }
    }
}
더 많은 예제를 살펴보려면 공식 GitHub 저장소의 샘플 앱을 확인하세요.