Guide for Swift
Using our Swift SDK, you can implement the haptic into your iOS, visionOS, and macOS apps.
- Install package
- Set Up Haptic Environment
- Connect Devices
Requirements
- Xcode 16 or later
- OS: iOS 13.0+, visionOS 2.0+, macOS 10.15+
- Internet connection, to download haptic events at initialization
- macOS only: bHaptics Player installed and running
- Deployed haptic application corresponding to your project
- App ID and API Key of the haptic app
- iOS / visionOS: The SDK connects to haptic devices directly over Bluetooth LE. No companion app is required.
- macOS: The SDK connects to bHaptics Player, and bHaptics Player manages the haptic devices. Pair your devices in bHaptics Player.
You use the same API on every platform.
About haptic application
You can create and manage haptic apps in Developer Portal, a web-based tool.
If you're unfamiliar with haptic apps or haven't created one yet, please follow the Portal guide before proceeding.
Before linking a haptic app to your game project, make sure the haptic app meets the following requirements:
- At least one haptic event must be created.
- API Key must be generated.
- There is no API Key by default. To generate one, go to the "API Key" tab and click "New" button.
- Haptic app must be deployed
- If you see "Deploy Now" button in the upper right corner, click it to deploy your haptic app. Otherwise, if you can see "Up to date", it means that the latest haptic app has already been deployed.
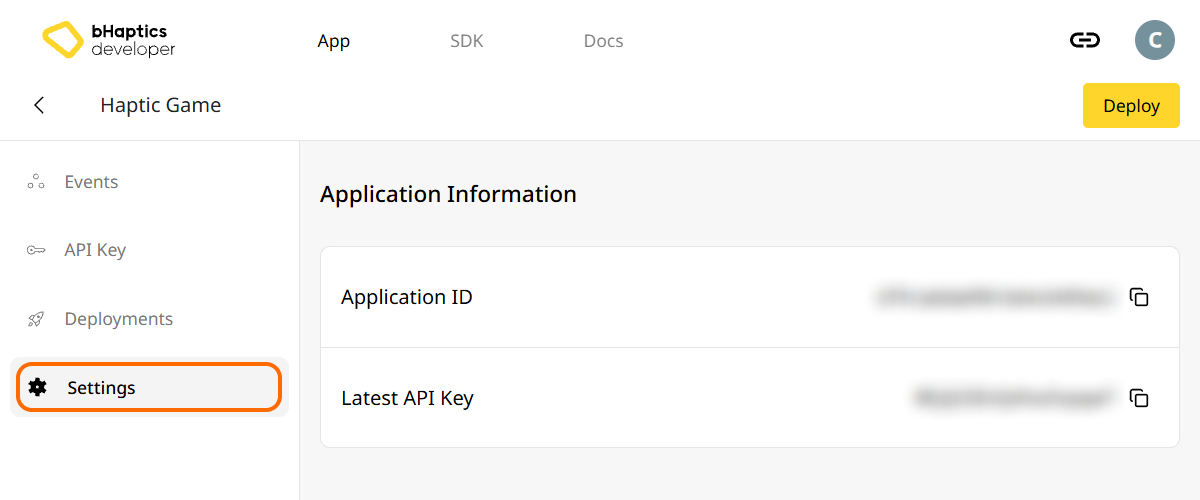
Also, link process requires App ID and API Key. Go to the "Settings" tab, and check the App ID and API Key.
Installation
Install the bHaptics Swift SDK with Swift Package Manager.
- In Xcode, select File > Add Package Dependencies....
- Enter the package URL:
https://github.com/bhaptics/bhaptics-ios - Set Dependency Rule to Up to Next Major Version from
1.0.1. - Add the
Bhapticslibrary to your app target.
If you manage dependencies in Package.swift, add the package as below:
dependencies: [
    .package(url: "https://github.com/bhaptics/bhaptics-ios", .upToNextMajor(from: "1.0.1"))
],
targets: [
    .target(
        name: "YourApp",
        dependencies: [.product(name: "Bhaptics", package: "bhaptics-ios")]
    )
]
Import Packages
import BhapticsPlugin
Bluetooth Permission
iOS / visionOS: Add NSBluetoothAlwaysUsageDescription (Privacy - Bluetooth Always Usage Description) to your app target's Info settings, with a message explaining why your app uses Bluetooth. The permission prompt appears when you create BhapticsKit. Without this key, the app crashes when the SDK accesses Bluetooth.
macOS: If App Sandbox is enabled, go to Signing & Capabilities > App Sandbox, and check Outgoing Connections (Client) so the SDK can connect to bHaptics Player.
Set Up Haptic Environment
Before using any haptic-related functions, you need to link the haptic app to your project, and initialize the haptic environment.
To do this, you need App ID and API Key of your haptic app. You can get them from the bHaptics Developer Portal.
Initialize
- Replace
"your_app_id"and"your_api_key"with your App ID and API Key. - Create one
BhapticsKitinstance and keep it for the lifetime of your app.
import BhapticsPlugin

let kit = BhapticsKit()

Task {
    let result = await kit.initialize(appId: "your_app_id", apiKey: "your_api_key", defaultSetting: "")
    print("Initialization result: \(result)")

    // Example: Play a haptic event
    let requestId = kit.play(eventId: "your_event_name")
    print("Request ID: \(requestId)")
}
On iOS and visionOS, initialize downloads the haptic events of your haptic app from the server. On macOS, it connects to bHaptics Player; start bHaptics Player before calling initialize.
Connect Devices
This step is for iOS and visionOS only. On macOS, pair the devices in bHaptics Player.
The SDK finds nearby bHaptics devices over Bluetooth LE. Once you pair a device, the SDK remembers it and reconnects it automatically when it is found in a later scan.
- Wait until Bluetooth is ready, then call
scan(). - Show the found devices to the user, and call
pair(device:)on the one the user selects. - Call
stopScan()when you are done.
Implement BhapticsKitDelegate to get notified when Bluetooth becomes ready and the device list changes.
import BhapticsPlugin

final class HapticManager: BhapticsKitDelegate {
    private var kit: BhapticsKit!
    private(set) var devices: [BhapticsDevice] = []

    init() {
        kit = BhapticsKit(delegate: self)
    }

    func pair(_ device: BhapticsDevice) {
        kit.pair(device: device)
    }

    // Bluetooth is ready. Start scanning.
    func bHapticsKit(_ kit: BhapticsKit, bleStateChange state: Bool) {
        if state {
            kit.scan()
        }
    }

    // Found, paired, connected, or disconnected devices.
    func bHapticsKit(_ kit: BhapticsKit, deviceStateUpdated devices: [BhapticsDevice]) {
        self.devices = devices
    }

    func bHapticsKit(_ kit: BhapticsKit, didConnect device: BhapticsDevice) {
        print("Connected: \(device.name)")
    }

    func bHapticsKit(_ kit: BhapticsKit, didDisconnect device: BhapticsDevice) {
        print("Disconnected: \(device.name)")
    }
}
Bluetooth does not work in iOS Simulator and visionOS Simulator. Use a real device to test haptic devices.
About Position
Functions that play haptics without events take position as an Int. The value is shared with the other bHaptics SDKs. Use BhapticsPosition.index to get it.
BhapticsPosition | index | Device | Motors Count |
|---|---|---|---|
.Vest | 0 | TactSuit Pro | 32 |
.ForearmL | 1 | TactSleeve(Left) | 3 |
.ForearmR | 2 | TactSleeve(Right) | 3 |
.Head | 3 | TactVisor | 4 |
.HandL | 4 | Tactosy for Hands(Left) | 3 |
.HandR | 5 | Tactosy for Hands(Right) | 3 |
.FootL | 6 | Tactosy for Feet(Left) | 3 |
.FootR | 7 | Tactosy for Feet(Right) | 3 |
.GloveL | 8 | TactGlove(Left) | 8 |
.GloveR | 9 | TactGlove(Right) | 8 |
let motorsCount = 32  // TactSuit Pro has 32 motors
let strength = 50     // 50% strength
let duration = 400    // 400 milliseconds

kit.playDot(position: BhapticsPosition.Vest.index, durationMillis: duration, arr: [Int](repeating: strength, count: motorsCount))
Further Reading
You're now ready to use the bHaptics haptic feature! Visit our Swift Reference to play haptics in your project, or refer the complete example code below.
If you have troubles for using this library, check the Troubleshooting.
Complete Example Code
The example below is a SwiftUI app that initializes the SDK, lists nearby devices to pair, and plays haptics.
The example uses SwiftUI .task and Section, so it requires iOS 15 / macOS 12 or later; the SDK itself supports iOS 13 and later.
import SwiftUI
import BhapticsPlugin

final class HapticViewModel: ObservableObject, BhapticsKitDelegate {
    // Replace with your App ID and API Key from the bHaptics Developer Portal.
    private let appId = "your_app_id"
    private let apiKey = "your_api_key"

    private var kit: BhapticsKit!

    @Published var status = "Not initialized"
    @Published var devices: [BhapticsDevice] = []
    @Published var events: [String] = []

    init() {
        kit = BhapticsKit(delegate: self)
        devices = kit.getDevices()
    }

    // 1. Initialize
    @MainActor
    func initialize() async {
        status = "Initializing..."
        let result = await kit.initialize(appId: appId, apiKey: apiKey, defaultSetting: "")
        status = result ? "Initialized" : "Initialization failed"
        events = kit.getEventList().sorted()
        devices = kit.getDevices()
    }

    // 2. Pair devices
    func togglePair(_ device: BhapticsDevice) {
        if device.paired {
            kit.unpair(device: device)
        } else {
            kit.pair(device: device)
        }
    }

    // 3. Play haptics
    func play(_ event: String) {
        _ = kit.play(eventId: event)
    }

    func playDot() {
        // First 16 of the TactSuit Pro's 32 motors.
        let motors = [Int](repeating: 50, count: 16) + [Int](repeating: 0, count: 16)
        kit.playDot(position: BhapticsPosition.Vest.index, durationMillis: 1000, arr: motors)
    }

    func stopAll() {
        kit.stopAll()
    }

    // BhapticsKitDelegate
    func bHapticsKit(_ kit: BhapticsKit, bleStateChange state: Bool) {
        if state { kit.scan() }
    }

    func bHapticsKit(_ kit: BhapticsKit, deviceStateUpdated devices: [BhapticsDevice]) {
        self.devices = devices
    }

    func bHapticsKit(_ kit: BhapticsKit, didConnect device: BhapticsDevice) {
        devices = kit.getDevices()
    }

    func bHapticsKit(_ kit: BhapticsKit, didDisconnect device: BhapticsDevice) {
        devices = kit.getDevices()
    }
}

struct ContentView: View {
    @StateObject private var viewModel = HapticViewModel()

    var body: some View {
        List {
            Section("Status") {
                Text(viewModel.status)
            }
            Section("Devices") {
                ForEach(viewModel.devices) { device in
                    Button {
                        viewModel.togglePair(device)
                    } label: {
                        HStack {
                            Text(device.name)
                            Spacer()
                            Text(device.connected ? "Connected" : device.paired ? "Paired" : "Tap to pair")
                        }
                    }
                }
            }
            Section("Events") {
                ForEach(viewModel.events, id: \.self) { event in
                    Button(event) { viewModel.play(event) }
                }
            }
            Section {
                Button("Play dot") { viewModel.playDot() }
                Button("Stop all") { viewModel.stopAll() }
            }
        }
        .task { await viewModel.initialize() }
    }
}
If you want to explore more examples, check the sample app in our official GitHub repository.