Swift 指南
使用我们的 Swift SDK,你可以将触觉功能集成到你的 iOS、visionOS 和 macOS 应用中。
- 安装软件包
- 设置触觉环境
- 连接设备
要求
- Xcode 16 或更高版本
- OS: iOS 13.0+, visionOS 2.0+, macOS 10.15+
- 互联网连接,用于在初始化时下载触觉事件
- 仅限 macOS:已安装并正在运行 bHaptics Player
- 与你的项目对应的已部署触觉应用程序
- 触觉应用的 App ID 和 API Key
- iOS / visionOS:SDK 通过 Bluetooth LE 直接连接触觉设备。无需配套应用。
- macOS:SDK 连接到 bHaptics Player,由 bHaptics Player 管理触觉设备。请在 bHaptics Player 中配对你的设备。
所有平台都使用相同的 API。
About haptic application
You can create and manage haptic apps in Developer Portal, a web-based tool.
If you're unfamiliar with haptic apps or haven't created one yet, please follow the Portal guide before proceeding.
Before linking a haptic app to your game project, make sure the haptic app meets the following requirements:
- At least one haptic event must be created.
- API Key must be generated.
- There is no API Key by default. To generate one, go to the "API Key" tab and click "New" button.
- Haptic app must be deployed
- If you see "Deploy Now" button in the upper right corner, click it to deploy your haptic app. Otherwise, if you can see "Up to date", it means that the latest haptic app has already been deployed.
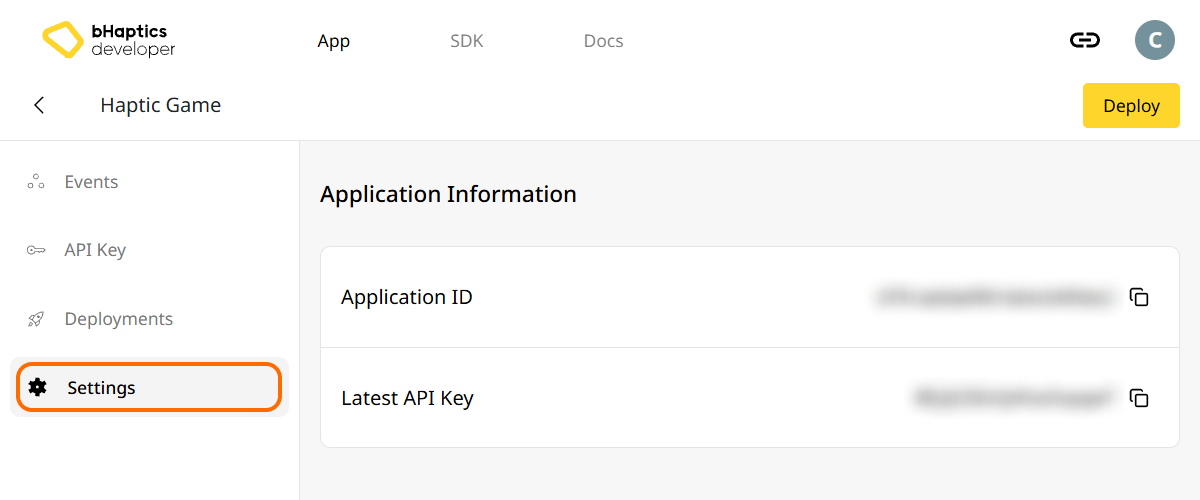
Also, link process requires App ID and API Key. Go to the "Settings" tab, and check the App ID and API Key.
安装
通过 Swift Package Manager 安装 bHaptics Swift SDK。
- 在 Xcode 中,选择 File > Add Package Dependencies...。
- 输入软件包 URL:
https://github.com/bhaptics/bhaptics-ios - 将 Dependency Rule 设置为从
1.0.1开始的 Up to Next Major Version。 - 将
Bhaptics库添加到你的应用目标(target)。
如果你在 Package.swift 中管理依赖项,请按如下方式添加软件包:
dependencies: [
    .package(url: "https://github.com/bhaptics/bhaptics-ios", .upToNextMajor(from: "1.0.1"))
],
targets: [
    .target(
        name: "YourApp",
        dependencies: [.product(name: "Bhaptics", package: "bhaptics-ios")]
    )
]
导入软件包
import BhapticsPlugin
Bluetooth 权限
iOS / visionOS:在应用目标的 Info 设置中添加 NSBluetoothAlwaysUsageDescription(Privacy - Bluetooth Always Usage Description),并附上说明应用为何使用 Bluetooth 的消息。创建 BhapticsKit 时会弹出权限请求。如果缺少此键,SDK 访问 Bluetooth 时应用会崩溃。
macOS:如果启用了 App Sandbox,请前往 Signing & Capabilities > App Sandbox,并勾选 Outgoing Connections (Client),以便 SDK 能够连接到 bHaptics Player。
设置触觉环境
在使用任何触觉相关函数之前,你需要将触觉应用关联到你的项目,并初始化触觉环境。
为此,你需要触觉应用的 App ID 和 API Key。你可以从 bHaptics Developer Portal 获取它们。
初始化
- 将
"your_app_id"和"your_api_key"替换为你自己的 App ID 和 API Key。 - 创建一个
BhapticsKit实例,并在应用的整个生命周期内保留它。
import BhapticsPlugin

let kit = BhapticsKit()

Task {
    let result = await kit.initialize(appId: "your_app_id", apiKey: "your_api_key", defaultSetting: "")
    print("Initialization result: \(result)")

    // Example: Play a haptic event
    let requestId = kit.play(eventId: "your_event_name")
    print("Request ID: \(requestId)")
}
在 iOS 和 visionOS 上,initialize 会从服务器下载你的触觉应用的触觉事件。在 macOS 上,它会连接到 bHaptics Player,请在调用 initialize 之前先启动 bHaptics Player。
连接设备
此步骤仅适用于 iOS 和 visionOS。在 macOS 上,请在 bHaptics Player 中配对设备。
SDK 通过 Bluetooth LE 查找附近的 bHaptics 设备。设备配对后,SDK 会记住该设备,并在之后的扫描中发现它时自动重新连接。
- 等待 Bluetooth 就绪,然后调用
scan()。 - 向用户显示找到的设备,并对用户选择的设备调用
pair(device:)。 - 完成后调用
stopScan()。
实现 BhapticsKitDelegate,以便在 Bluetooth 就绪以及设备列表发生变化时收到通知。
import BhapticsPlugin

final class HapticManager: BhapticsKitDelegate {
    private var kit: BhapticsKit!
    private(set) var devices: [BhapticsDevice] = []

    init() {
        kit = BhapticsKit(delegate: self)
    }

    func pair(_ device: BhapticsDevice) {
        kit.pair(device: device)
    }

    // Bluetooth is ready. Start scanning.
    func bHapticsKit(_ kit: BhapticsKit, bleStateChange state: Bool) {
        if state {
            kit.scan()
        }
    }

    // Found, paired, connected, or disconnected devices.
    func bHapticsKit(_ kit: BhapticsKit, deviceStateUpdated devices: [BhapticsDevice]) {
        self.devices = devices
    }

    func bHapticsKit(_ kit: BhapticsKit, didConnect device: BhapticsDevice) {
        print("Connected: \(device.name)")
    }

    func bHapticsKit(_ kit: BhapticsKit, didDisconnect device: BhapticsDevice) {
        print("Disconnected: \(device.name)")
    }
}
Bluetooth 在 iOS Simulator 和 visionOS Simulator 中无法使用。请使用真机测试触觉设备。
关于位置
不使用事件播放触觉的函数以 Int 类型接收 position。该值与其他 bHaptics SDK 通用。使用 BhapticsPosition.index 获取该值。
BhapticsPosition | index | 设备 | 马达数量 |
|---|---|---|---|
.Vest | 0 | TactSuit Pro | 32 |
.ForearmL | 1 | TactSleeve(Left) | 3 |
.ForearmR | 2 | TactSleeve(Right) | 3 |
.Head | 3 | TactVisor | 4 |
.HandL | 4 | Tactosy for Hands(Left) | 3 |
.HandR | 5 | Tactosy for Hands(Right) | 3 |
.FootL | 6 | Tactosy for Feet(Left) | 3 |
.FootR | 7 | Tactosy for Feet(Right) | 3 |
.GloveL | 8 | TactGlove(Left) | 8 |
.GloveR | 9 | TactGlove(Right) | 8 |
let motorsCount = 32  // TactSuit Pro has 32 motors
let strength = 50     // 50% strength
let duration = 400    // 400 milliseconds

kit.playDot(position: BhapticsPosition.Vest.index, durationMillis: duration, arr: [Int](repeating: strength, count: motorsCount))
延伸阅读
现在你已经准备好使用 bHaptics 触觉功能了!要在你的项目中播放触觉,请访问我们的 Swift 参考,或参考下面的完整示例代码。
如果你在使用此库时遇到问题,请查看故障排除。
完整示例代码
下面的示例是一个 SwiftUI 应用,它会初始化 SDK、列出附近可配对的设备并播放触觉。
此示例使用了 SwiftUI 的 .task 和 Section,因此需要 iOS 15 / macOS 12 或更高版本(SDK 本身支持 iOS 13 及以上)。
import SwiftUI
import BhapticsPlugin

final class HapticViewModel: ObservableObject, BhapticsKitDelegate {
    // Replace with your App ID and API Key from the bHaptics Developer Portal.
    private let appId = "your_app_id"
    private let apiKey = "your_api_key"

    private var kit: BhapticsKit!

    @Published var status = "Not initialized"
    @Published var devices: [BhapticsDevice] = []
    @Published var events: [String] = []

    init() {
        kit = BhapticsKit(delegate: self)
        devices = kit.getDevices()
    }

    // 1. Initialize
    @MainActor
    func initialize() async {
        status = "Initializing..."
        let result = await kit.initialize(appId: appId, apiKey: apiKey, defaultSetting: "")
        status = result ? "Initialized" : "Initialization failed"
        events = kit.getEventList().sorted()
        devices = kit.getDevices()
    }

    // 2. Pair devices
    func togglePair(_ device: BhapticsDevice) {
        if device.paired {
            kit.unpair(device: device)
        } else {
            kit.pair(device: device)
        }
    }

    // 3. Play haptics
    func play(_ event: String) {
        _ = kit.play(eventId: event)
    }

    func playDot() {
        // First 16 of the TactSuit Pro's 32 motors.
        let motors = [Int](repeating: 50, count: 16) + [Int](repeating: 0, count: 16)
        kit.playDot(position: BhapticsPosition.Vest.index, durationMillis: 1000, arr: motors)
    }

    func stopAll() {
        kit.stopAll()
    }

    // BhapticsKitDelegate
    func bHapticsKit(_ kit: BhapticsKit, bleStateChange state: Bool) {
        if state { kit.scan() }
    }

    func bHapticsKit(_ kit: BhapticsKit, deviceStateUpdated devices: [BhapticsDevice]) {
        self.devices = devices
    }

    func bHapticsKit(_ kit: BhapticsKit, didConnect device: BhapticsDevice) {
        devices = kit.getDevices()
    }

    func bHapticsKit(_ kit: BhapticsKit, didDisconnect device: BhapticsDevice) {
        devices = kit.getDevices()
    }
}

struct ContentView: View {
    @StateObject private var viewModel = HapticViewModel()

    var body: some View {
        List {
            Section("Status") {
                Text(viewModel.status)
            }
            Section("Devices") {
                ForEach(viewModel.devices) { device in
                    Button {
                        viewModel.togglePair(device)
                    } label: {
                        HStack {
                            Text(device.name)
                            Spacer()
                            Text(device.connected ? "Connected" : device.paired ? "Paired" : "Tap to pair")
                        }
                    }
                }
            }
            Section("Events") {
                ForEach(viewModel.events, id: \.self) { event in
                    Button(event) { viewModel.play(event) }
                }
            }
            Section {
                Button("Play dot") { viewModel.playDot() }
                Button("Stop all") { viewModel.stopAll() }
            }
        }
        .task { await viewModel.initialize() }
    }
}
如果你想探索更多示例,请查看我们官方 GitHub 仓库中的示例应用。